

|
|
|
|
Donna Carter, Polly Parnell & David Wimberly
University of Arkansas
SACUBO, April 2008
This paper focuses on how a new electronic travel claim revolutionized and streamlined claim processing for the University of Arkansas; with benefits realized for travelers, administrators, and even the audit staff. It is composed of the following sections:
The University of Arkansas' mission is to be A nationally competitive student-centered research university serving Arkansas and the world. It is Arkansas' flagship public land grant university with entrollment of 18,000 students and employment of 3,700 permanent faculty and staff. It also supports extensive research and is a Carnegie Research institution. The University processes approximately 23,000 travel claims a year with a total travel expenditure of $10,000,000.
All University non-student applications have been developed in house using the Software AG tools Natural, ADABAS, and Com-Plete. The resulting suite of applications is named BASIS for Business and Administrative Strategic Information Systems. Development of these systems began in the early 1990s and continues today. We began web enabling our BASIS applications in 2001 using Software AG's Com-Plete HTTP Server which runs on the mainframe and allows coding in Natural -- the same language used for the 3270 terminal access of BASIS. Our objective with web enablement was not to replace our 3270 screens, but rather to:
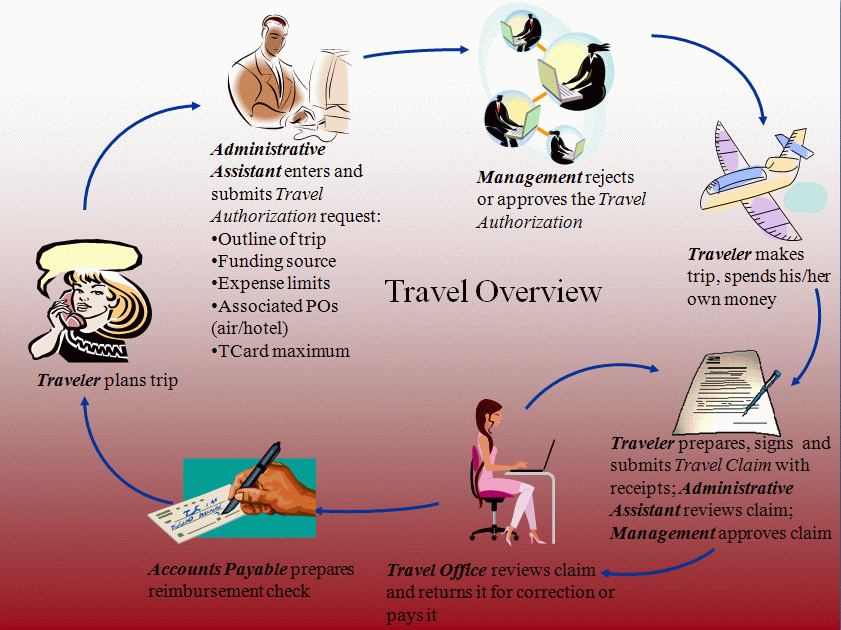
Figure 1 depicts the overall travel process at the University. It starts with the creation of a Travel Authorization. We have had an electronic Travel Authorization since 1995. That document defines the overall trip: dates, destination, spending limits, funding, advance request, and related POs. It is electronically approved by the appropriate managers. Internally within our system it is treated as a purchase order complete with the encumbrance of funds. After the trip the claim is tied to this authorization and, when paid, it closes the PO and unencumbers the funds. In this diagram there is no distinction between the paper claim versus the electronic claim.
|
| Figure 1. Travel Overview. |
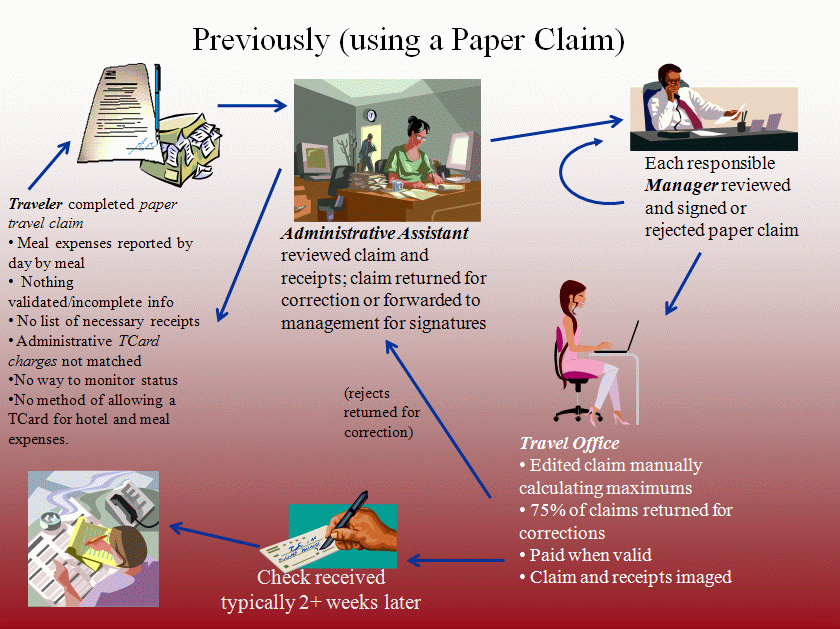
Figure 2 is a graphical representation of the old paper claim process. Although an Excel spreadsheet was available as a travel claim form, its automation features were limited to merely adding up some columns. No data was really validated and the end result was not much different from filling in a blank paper form by hand. That document, with receipts, was then reviewed by an administrative assistant and then placed into campus mail to be routed to the appropriate managers for approval and signing. The last stop, of course, was the Travel Office where every item on the document had to be manually scrutinized and validated. This was a very time consuming process when it came to meal and lodging expense limits. Our reject rate of incorrect or incomplete claims was near 80%. Needless to stay this created a burden on everyone in the cycle: the traveler who is still waiting for the return of their money spent, the administrative assistants, the approving managers, and (oh yea) the Travel Office.
|
| Figure 2. Paper Claim Processing -- the old way. |
Some of the more significant problems with the paper claim process were:
Now, imagine a new level of productivity and information access where:
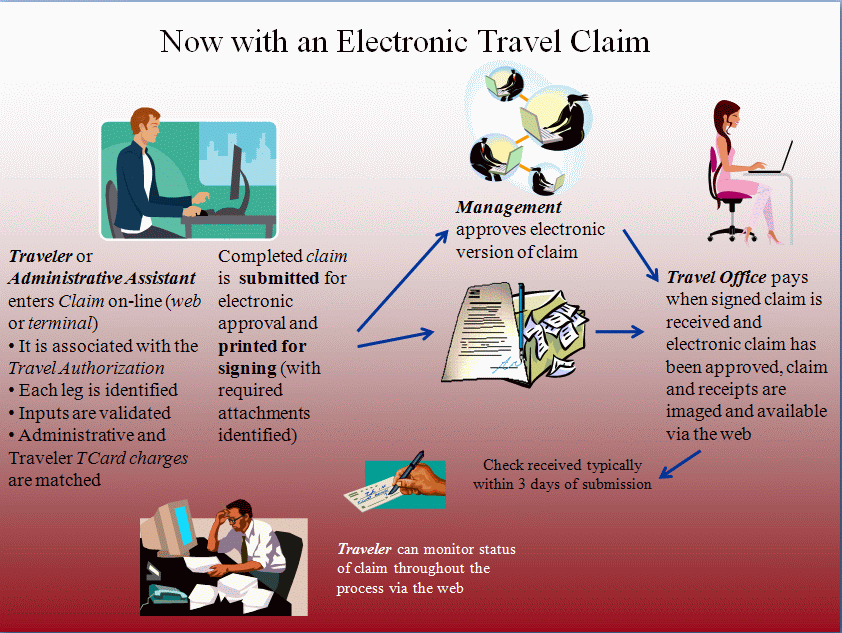
Figure 3 shows the processing flow for our new electronic travel claim.
|
| Figure 3. Electronic Claim Processing. |
Here are some issues you should consider before embarking on such project.
Some of the critical areas which we concentrated on were:
Most trips involve only two legs. You leave home and arrive at a destination where you stay some amount of time, and then you return home. Such trips involve a departure time from home, a departure time from the destination, and an arrival time back at home. We have all possible destinations (cities) coded on a table so we know the federal per diem and can calculate maximum meal and lodging expenses based upon the time of arrival and departure. We make sure we provide quick turn around when a new destination is identified and needs to be added to our table. In summary:
With buy in from our audit staff , we no longer require the traveler to break down meal expenses by day by meal. Instead, they only tell us the total amount they spent on meals during the entire trip. We populate our destination table (city and state or country) with the federal meal per diem (breakfast, lunch and dinner) and the highest sales tax rate for the State. The system uses this data with the leg detail to calculate a maximum allowable meal expense. If a traveler attempts to claim more, they receive an error which includes the maximum allowed. If the University has paid an additional amount for a meal that is in excess of the registration, this can be documented on the Travel Authorization and the Travel Office factors this in when processing the claim.
When a PO is created in conjunction with a trip, whether it be airfare, registration, car rental, etc., the user is required to enter the Travel Authorization number. The system then knows what TA this PO goes with, and thus the resulting Travel Claim.
If the department has used their Administrative TCard to purchase airline tickets, registration, car rental, etc., they are required to approve those charges. At that time the system requires them to enter the Travel Authorization number that goes with the charge, and thus they are linked to the resulting Travel Claim.
The result is that both travel related POs and Administrative TCard charges are tied to a specific trip and travel claim.
We now provide a University credit card for our frequent travelers. We call this a Traveler TCard, versus the more traditional Administrative TCard. Travelers are able to put all of their travel expenses on this card with the University paying the bill. These charges are treated as a receivable against the card holder and are paid when associated with a Travel Claim. In this way they operate very much like a Travel Advance. We currently have 127 of these Traveler TCards in use, which includes all of the coaches in Women�s Athletics where they use them for all of their team travel and recruiting trips. This has alleviated their need to take large amounts of cash with them, or to carry these expenses on their personal credit card. We have had great success with this program.
The key features of our electronic travel claim include:
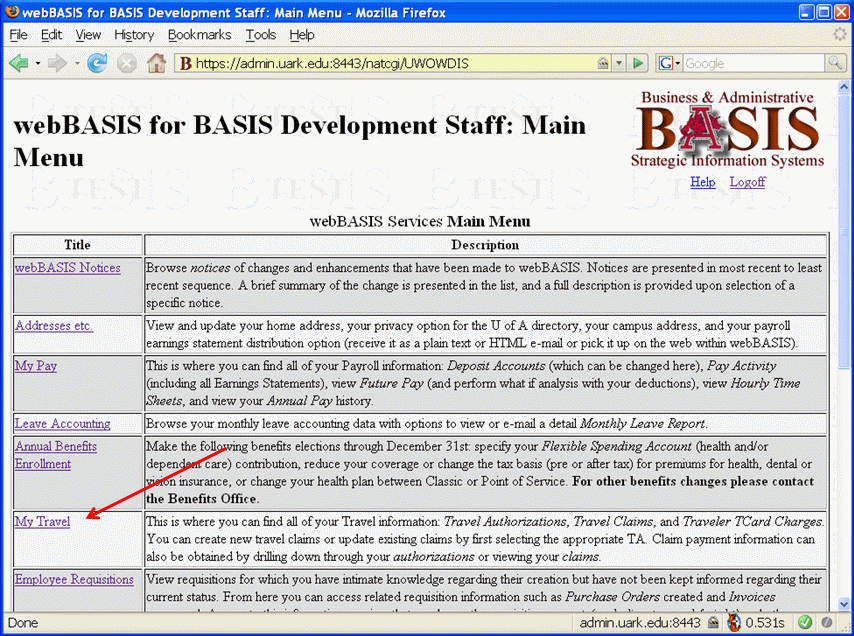
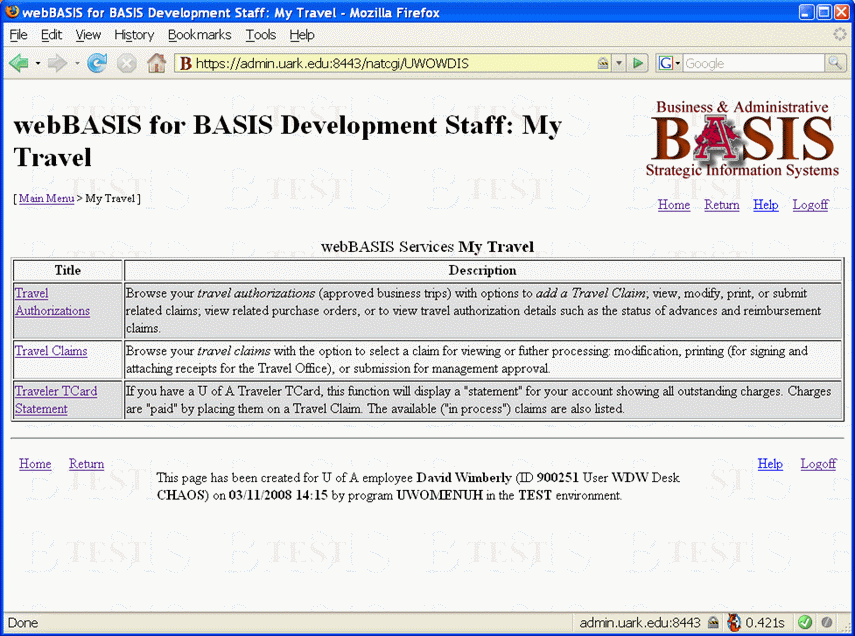
A picture is provided of our electronic travel claim process by including snap shots of web pages, portions of pages, and even the 3270 terminal screens used by the Travel Office to pay a claim. Figure 4 is the main menu presented to a University employee via our webBASIS system. The area of interest here is the My Travel option.
|
| Figure 4. webBASIS Main Menu with My Travel. |
Figure 5 depicts the My Travel menu. We will start by looking at the Traveler TCard Statement.
|
| Figure 5. My Travel menu. |
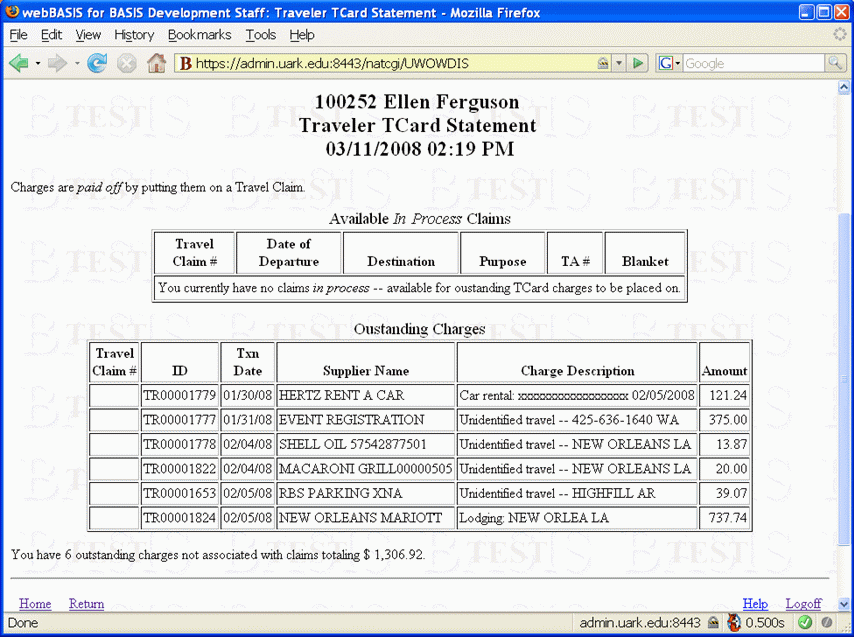
This statement, Figure 6, shows two things. First is a list of all Travel Claims that are in process meaning that charges may be associated with those claims. The second is a list of all Traveler TCard charges not yet associated with a claim – these are the outstanding ones that the card holder will be billed for if they do not associate them with a claim.
|
| Figure 6. Traveler TCard Statement. |
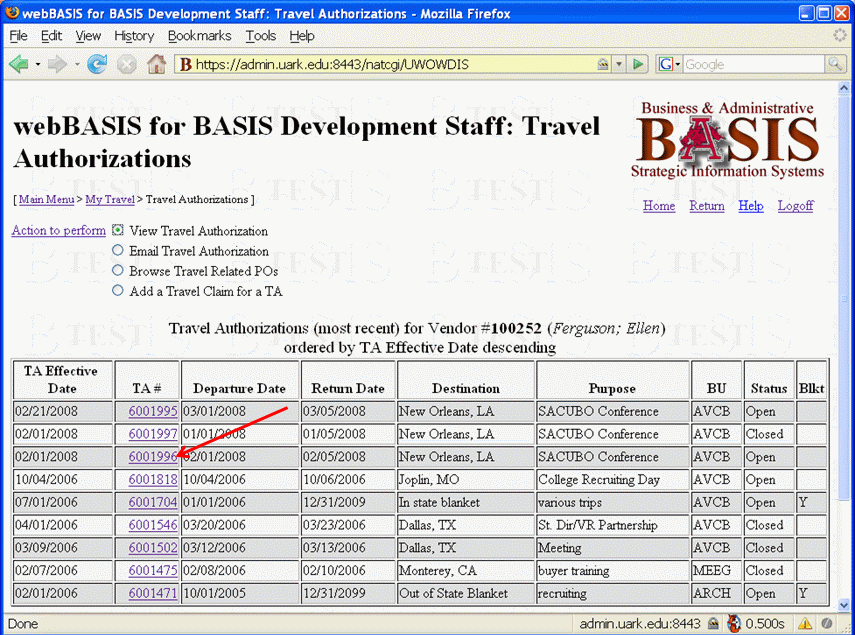
Figure 7 shows the results of the first choice from the My Travel menu, a list of Travel Authorizations. In our example, we are concerned about the 02/01/2008 trip to New Orleans for the SACUBO conference, which is in an open status meaning we can file a claim against it. We merely point and click on the TA Number 6001996.
|
| Figure 7. List of Travel Authorizations available for selection. |
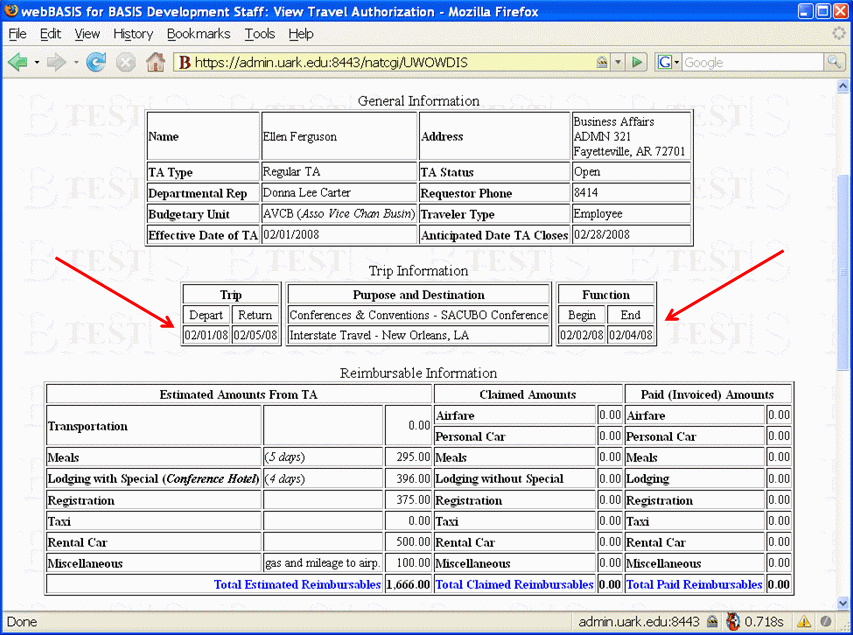
This results in a display of the Travel Authorization selected, as shown in Figure 8. The first thing a user should do is ensure that this is the trip for which they want to create a claim. This can be done by reviewing the Trip Information displayed. Note that the claimed and paid amounts are all zero at this time.
|
| Figure 8. Travel Authorization before the entry of a claim. |
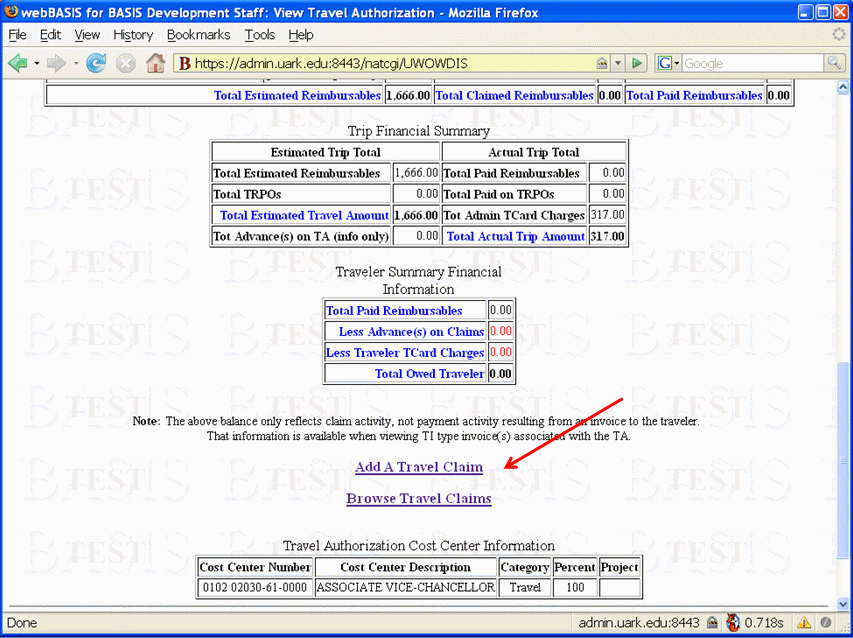
The bottom portion of the Travel Authorization page is shown in Figure 9. It includes links for adding a new claim (what we will be doing) or for browsing the claims associated with this TA. (Multiple claims can be made against the same TA, for situations when some expense was inadvertently left off an original claim or where there is recurring travel.)
|
| Figure 9. Travel Authorization with Add a Travel Claim link. |
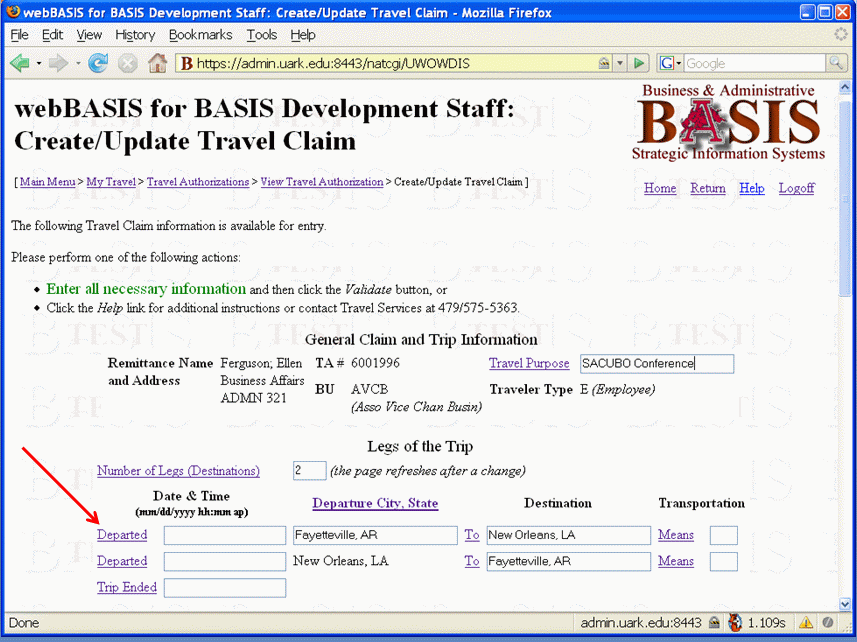
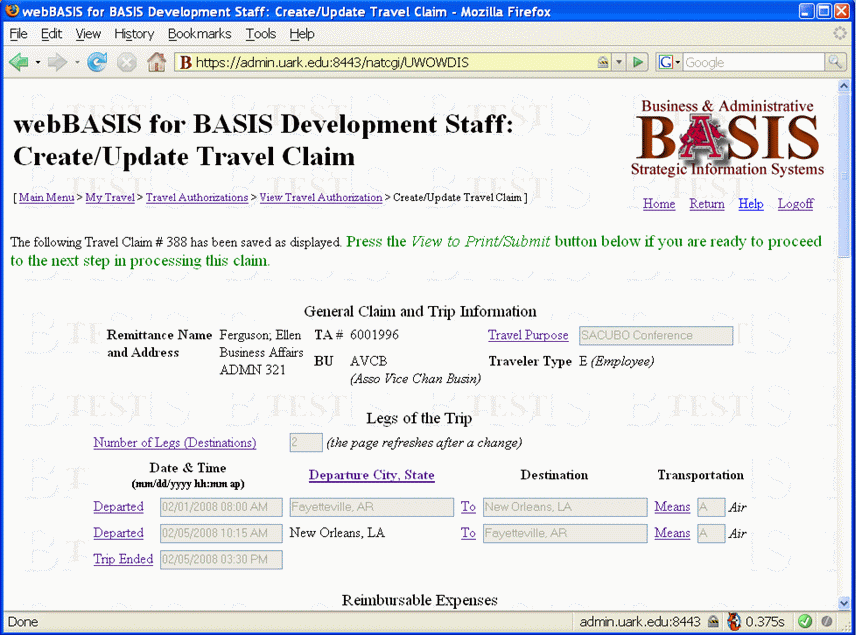
Figure 10 shows the top portion of the Travel Claim page. The purpose of the trip is brought forward from the TA but can be changed. The first required entries are for the number of legs (the page is redrawn appropriately when this is changed) and the departure date and time, departure city (only once for the trip origination), destination city, and means of transportation for each leg. The final entry field in this section is the date and time when the trip ended – when the traveler returned to their official station. All entry fields are identified by a tag which is a hyper-link that will open a help window that will assist with the entry. The window for a date/time entry is presented next, while help for the departure and destination cities allows searching and selecting a value from our destination table. (The means of transportation also has a help window where the possible values are presented for selection.)
|
| Figure 10. Travel Claim top portion of entry page. |
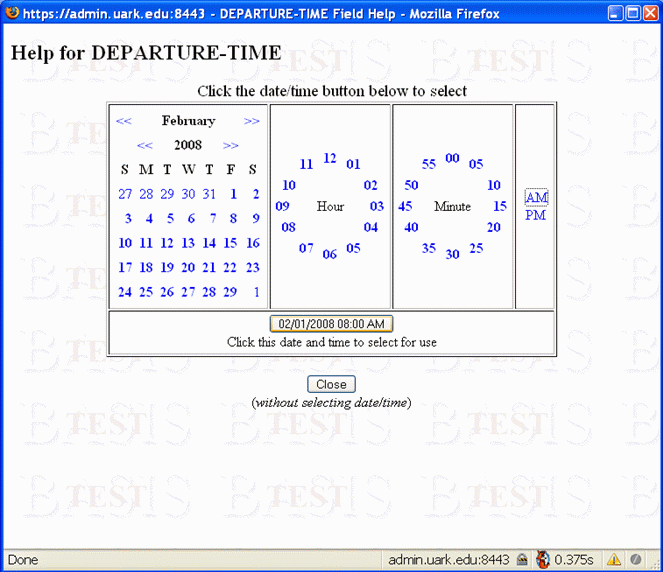
The help window for date and time field is shown in Figure 11. It includes a calendar for date selection, hours and minutes presented in the image of a clock face for selection, and an AM/PM selection. The button showing the resulting date and time is filled in as selections are made and becomes available to be pressed (enabled) once all components are chosen. Pressing it returns the constructed value to the Travel Claim entry page.
|
| Figure 11. Departure Time help window. |
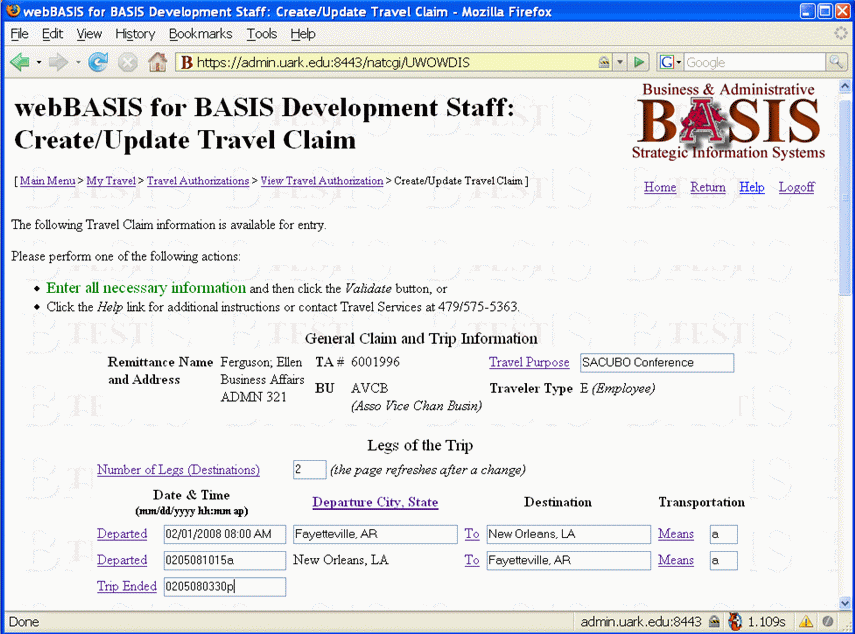
The help window does not have to be used for a date and time entry field. Instead they can be entered in a variety of ways as long as the sequence month, day, year, hour, minute, A/P is used. Figure 12 shows a common short hand way specifying a date and time, although others are also available.
|
| Figure 12. Travel Claim alternate departure date and time entry formats. |
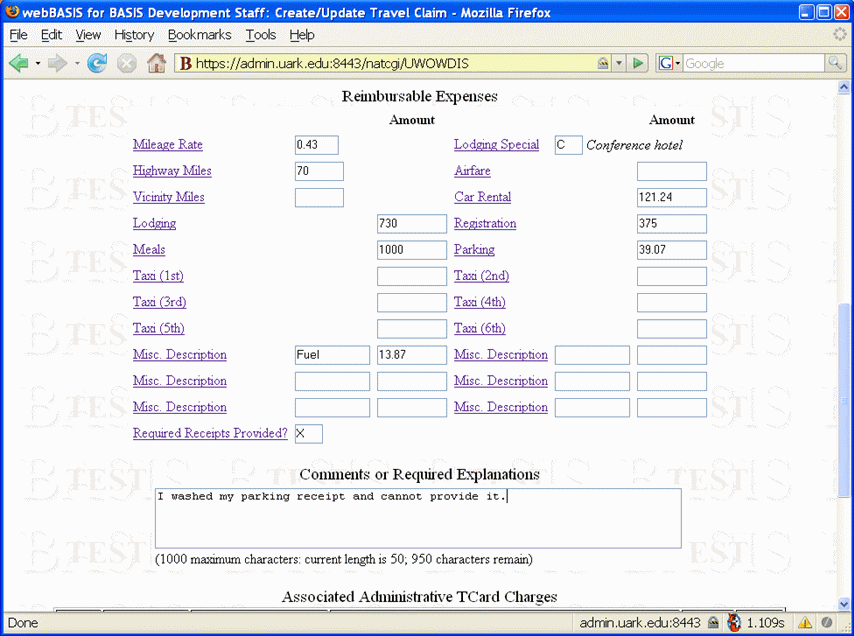
The portion of the Travel Claim page for entering reimbursable expenses and any comment is shown in Figure 13. In some circumstances the system will require the entry of a comment.
|
| Figure 13. Travel Claim entry page section with travel expenses and free form comment. |
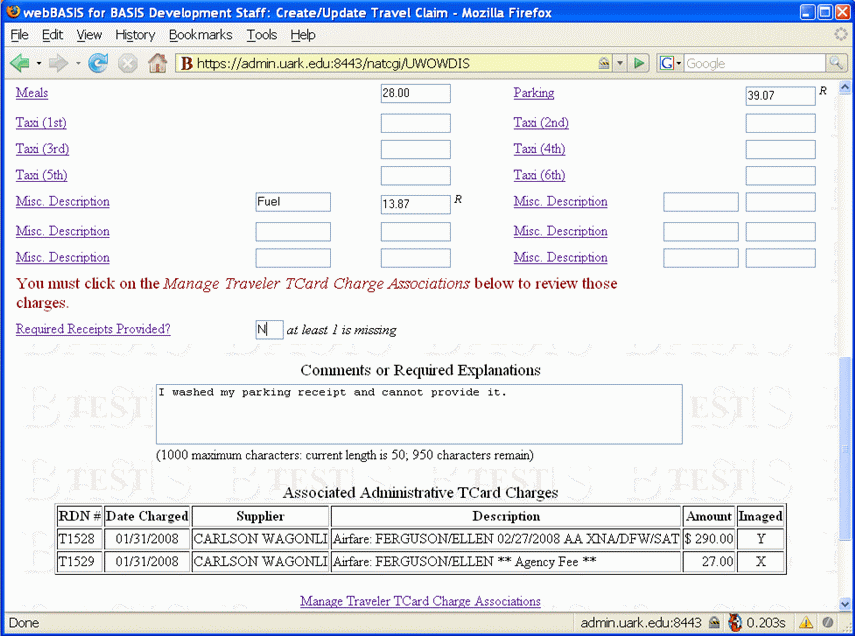
If there are any outstanding Traveler TCard Charges, the system requires the user to click on the link Manage Traveler TCard Charge Associations. The error message displayed in red in Figure 14 is prompting the user to take this action. This link will open a window (shown in Figure 15) where those charges are displayed and are available for selection.
|
| Figure 14. Travel Claim entry page with error regarding managing Traveler TCard associations. |
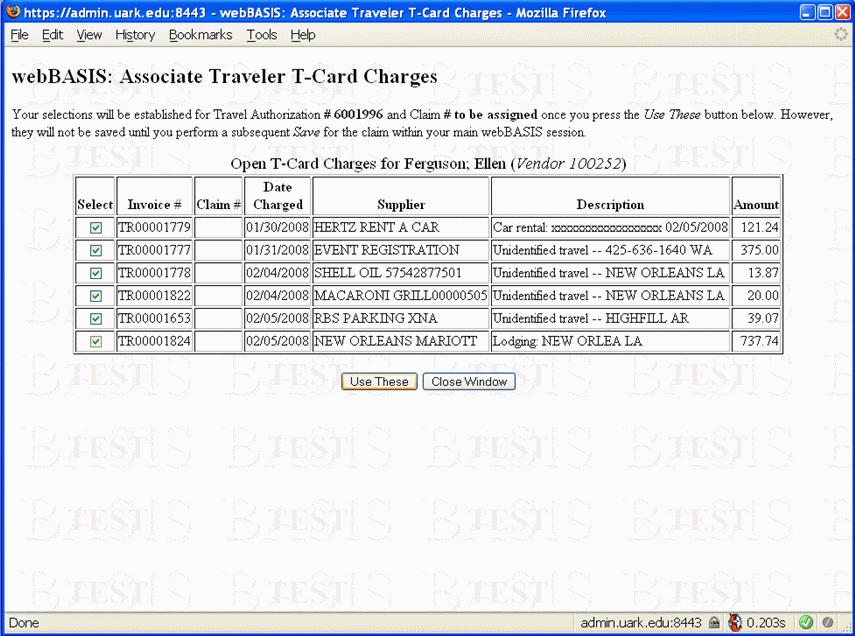
The list of outstanding Traveler TCard Charges displayed in Figure 15 is the same list as presented on the Traveler TCard Statement we saw in Figure 6. The user merely checks off the charges associated with this trip/travel claim and then clicks the Use These button. If none of the outstanding charges are part of this trip, the user makes no selection and closes the window – we have at least made them look at the charges.
|
| Figure 15. Travel Claim window for selecting associated Traveler TCard Charges. |
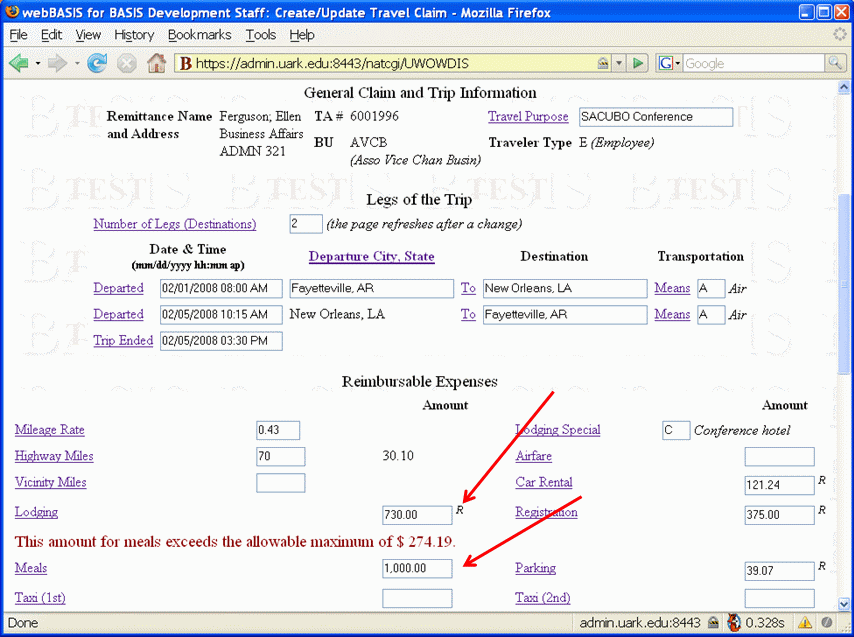
Figure 16 shows two things. First is the super-script R to the right of any expense where a receipt will be required. Second is the error produced when meal expenses exceed the maximum that the system has calculated based upon the time spent at each destination using the per diem stored on our destination table. What a time saver this is.
|
| Figure 16. Travel Claim meal expense error and required receipt indicator. |
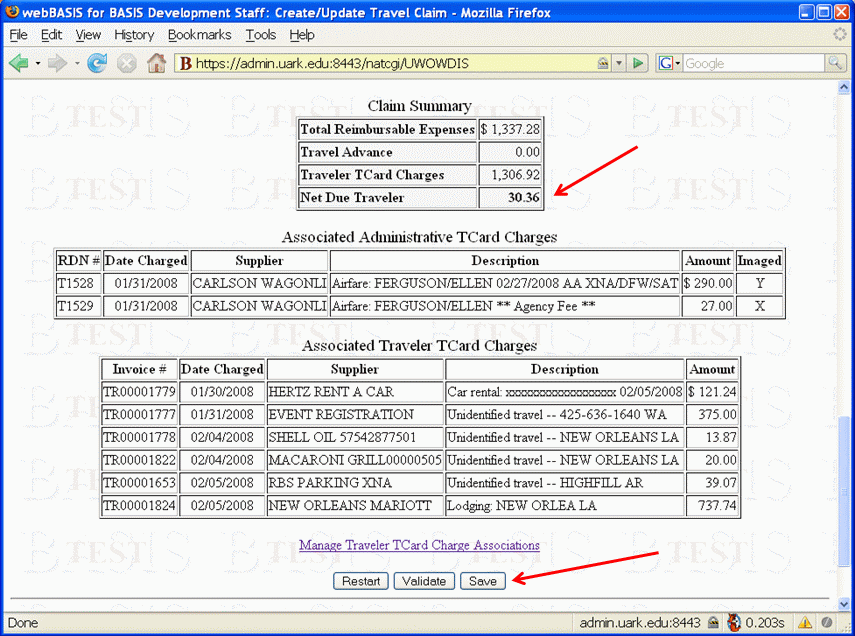
Figure 17 shows the bottom portion of the Travel Claim page once all errors have been corrected. The claim summary shows the total expenses claimed less any travel advance provided and the Traveler TCard charges which the University has already paid. The net result is what the traveler will be reimbursed, or what he/she owes the University. Also shown are the associated Administrative and/or Traveler TCard charges and the action buttons available at the time – like Save!
|
| Figure 17. Bottom of Travel Claim entry page without errors. |
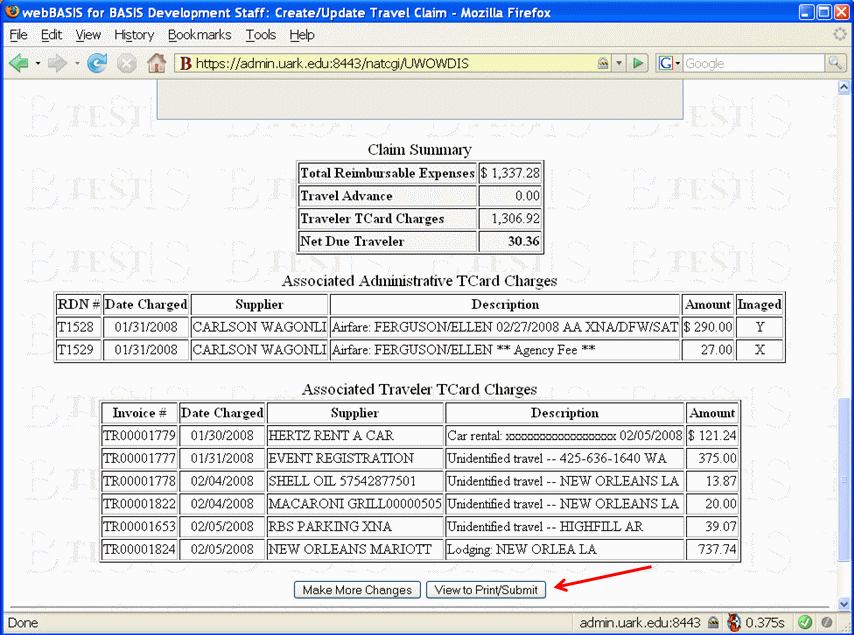
Once the claim is saved the entry fields become protected and the user receives a confirmation message and a prompt regarding his/her possible next action as shown in Figure 18.
|
| Figure 18. Confirmation message that a new Travel Claim has been saved. |
The action buttons available after saving a claim are at the bottom of the page as shown in Figure 19. They allow further update of the claim, or if complete it can be viewed with options for printing and/or submitting for managerial approval.
|
| Figure 19. The Print/Submit button available on a saved Travel Claim. |
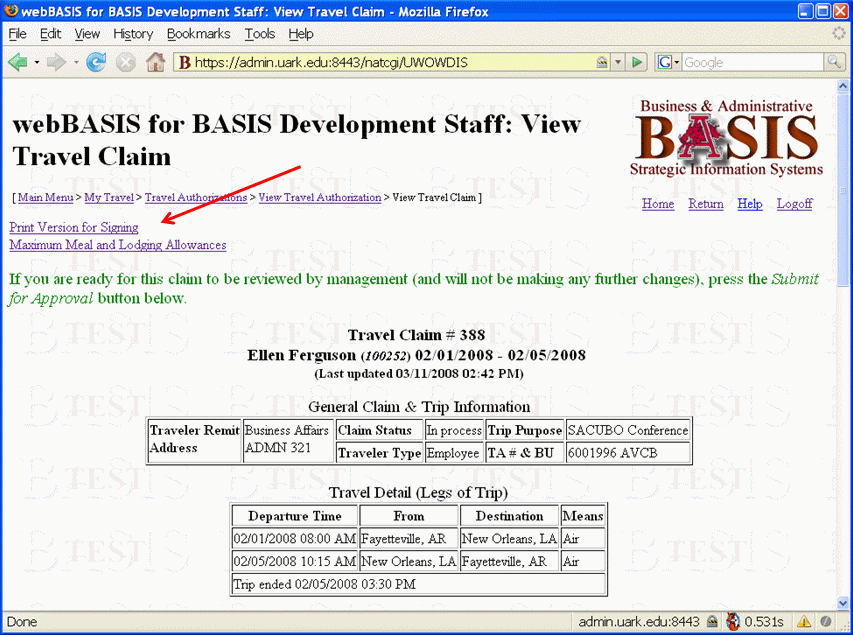
When viewing a complete but in process claim, as shown in Figure 20, the top portion of the page includes links for formating the claim for printing and signing (which will include a cover page with instructions) and for viewing a breakdown of how the maximum meal and lodging expenses were calculated. Also shown is the prompt (in green) to submit the claim for approval.
|
| Figure 20. Link for formatting Travel Claim for printing and signing. |
The bottom portion of a complete but in process claim is shown in Figure 21. Here action buttons are available to make further changes to the claim or to submit it for approval.

|
| Figure 21. Submit button for requesting management approval of the Travel Claim. |
Figure 22 shows the result of clicking the Maximum Meal and Lodging Allowances link shown in Figure 20. This window displays the date and time at each destination; the per diem meal allowance, number of meals allowed, and the extended total for breakfast, lunch and dinner; and the nightly lodging allowance, the number of nights allowed, and the extended total. The meal and lodging allowances are then totalled for the entire trip. Everyone including the auditors loves having this information so readily available.

|
| Figure 22. Window showing the maximum allowable lodging and meal expense. |
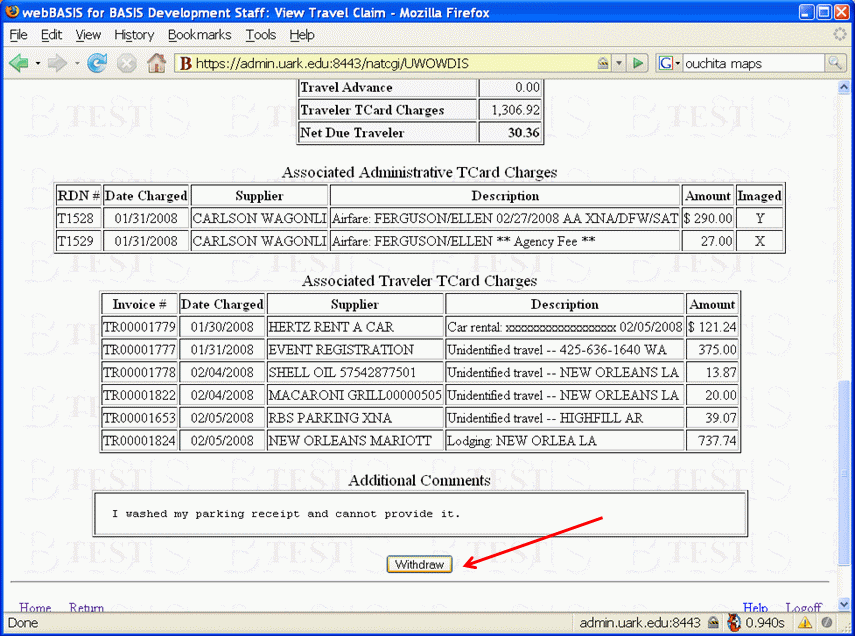
An option is provided for a claim that has been submitted for approval to be withdrawn as long as final approval has not yet occurred. Figure 23 shows this Withdraw button at the bottom of the page for a claim in status submitted for approval.
|
| Figure 23. Button to withdraw claim up until the point of final approval. |
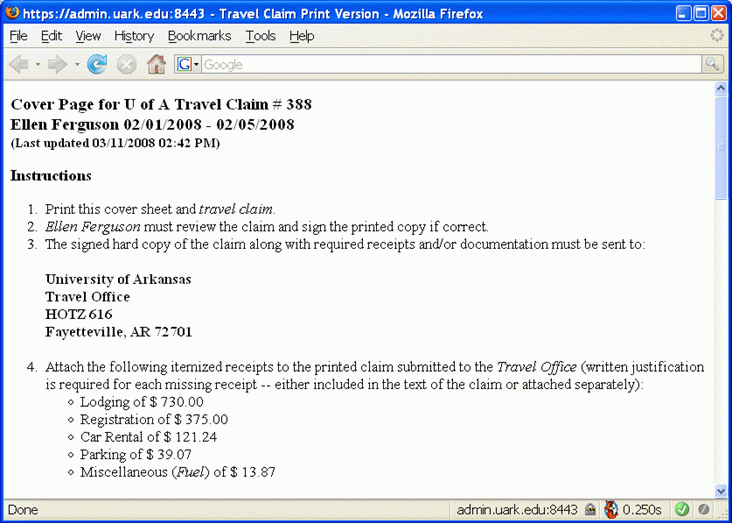
A printed copy of a claim with the traveler signature and accompanying receipts is still required for obvious reasons. Figure 24 shows the cover page produced when the Print Version for Signing link (as shown in Figure 20) is clicked. The reminders here have greatly reduced the number of requests for missing documents.
|
| Figure 24. Cover page generated above the copy of a claim formatted for printing. |
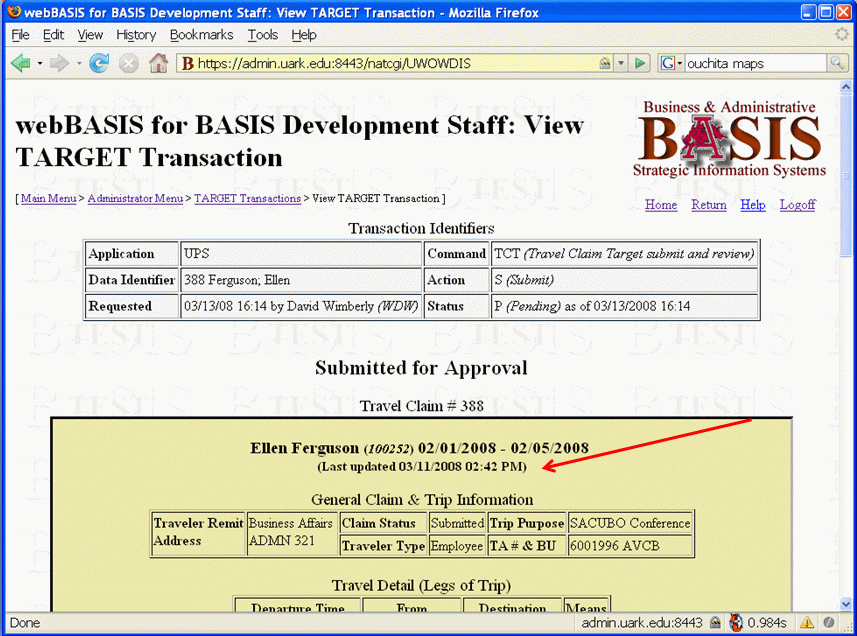
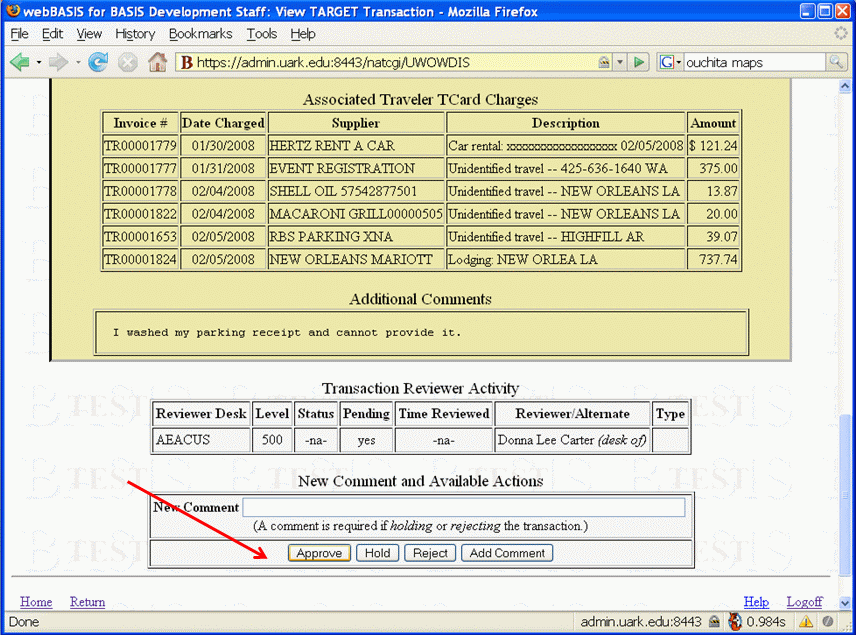
Figure 25 shows how a claim is presented within our electronic approval system (named TARGET). The Travel Office is the last approver of a claim and ensures that the Last Updated date and time displayed in the electronic claim matches that on the printed claim. Otherwise, any difference indicates that the signed paper copy may not match the electronic claim.
|
| Figure 25. Travel claim as presented in the electronic approval process with date/time of last update. |
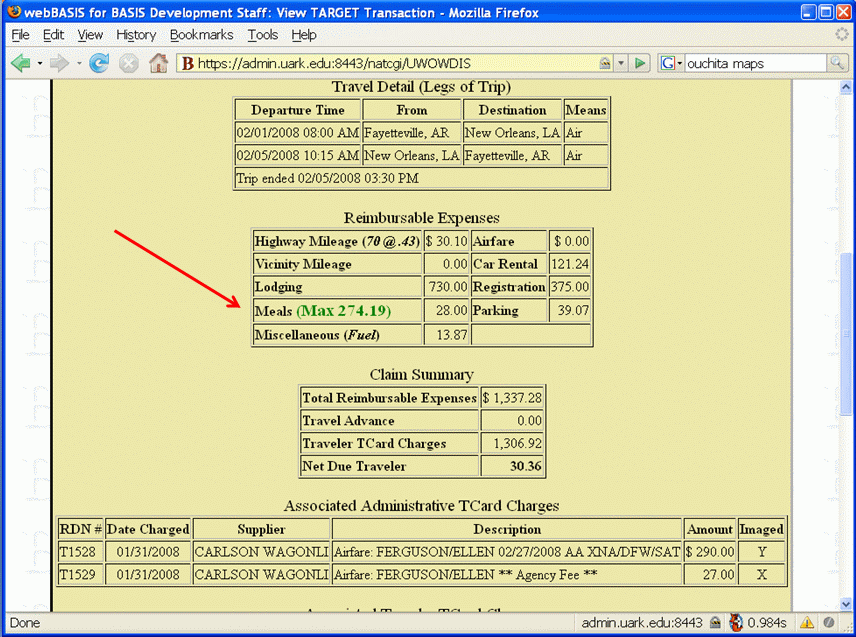
The version of the claim presented during the electronic approval process also includes a display of the maximum meal allowance as calculated by the system and shown in Figure 26. This may be important to a manager that knows that some meals were provided and yet the traveler is still claiming the maximum. Our policy is that travelers are to claim actual expenses (not to exceed the allowable maximum).
|
| Figure 26. Travel claim expense portion as presented in the electronic approval process with maximum meal expense. |
The action buttons available during the electronic approval process are shown in Figure 27.
|
| Figure 27. Action buttons available during the electronic approval process. |
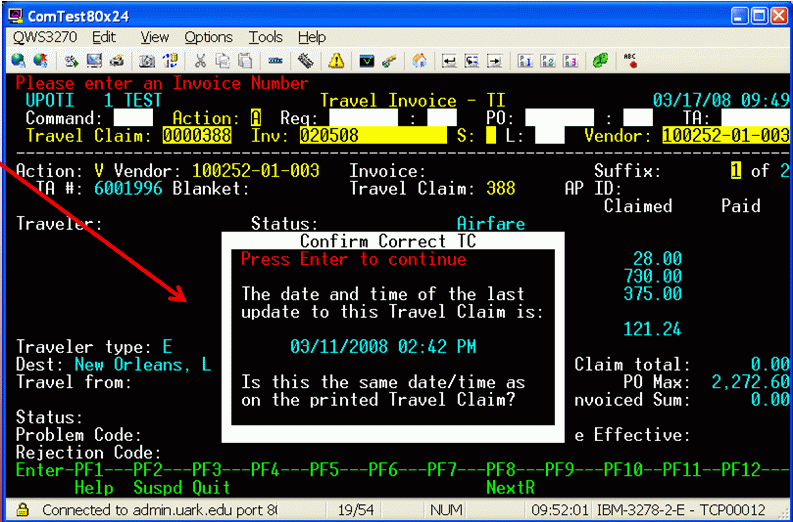
The Travel Office uses a mainframe 3270 terminal interface to pay travel claims. The first step in the process is for the payer to confirm that the last update date and time of the electronic claim matches the paper copy in hand. The confirmation window where this is performed is shown in Figure 28.
|
| Figure 28. Travel Invoice screen used to confirm that the printed and electronic claims match. |
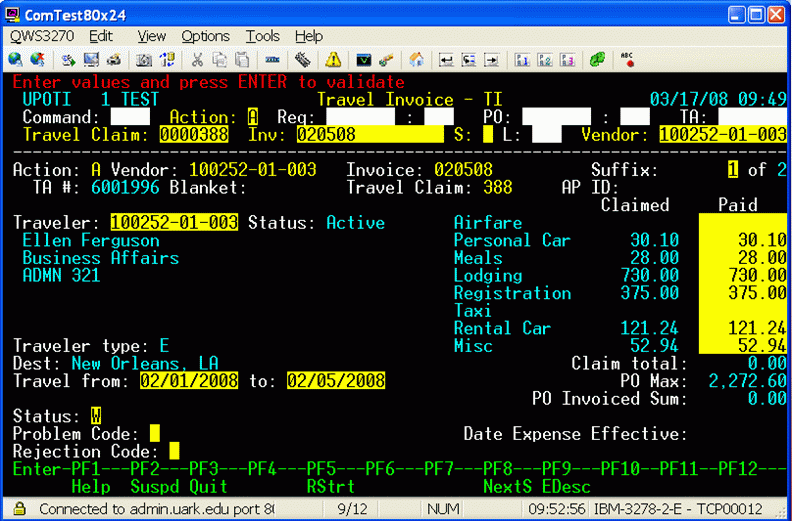
Figure 29 shows the 3270 screen used by the Travel Office to create a Travel Invoice which will be paid via our Accounts Payable system. The expense amounts are brought in from the claim but may be changed as deemed appropriate (these are the reverse video yellow fields in this example).
|
| Figure 29. Travel Invoice entry screen used by the Travel Office to pay a claim. |
Figure 30 shows how a paid claim is displayed on the web. It shows claimed versus paid amounts, a new Payment Summary, and AP payment details including a link to view images of the signed claim and accompanying receipts.

|
| Figure 30. Appearance on the web of a paid Travel Claim. |
The University of Arkansas has really benefited from having an electronic travel claim. Here are some of the ways it has made us all winners.
Add these up and what we have is improved customer service!
For more information, please feel free to contact the authors.